Showing posts with label Simple BPM. Show all posts

Thursday 9 March 2017

Integration of Oracle BPM/Human Task and Oracle UCM/Web Center Content

In this post, I will describe the process of integrating the Oracle BPM/Human Task and Oracle UCM/Web Center Content. This is required to get the Attachment functionality in you BPM process or in Human Task flow.
Lets Start,
Go to Documents Tab in your Human Task flow, Enable the ‘Use Document Package’


Now, if you deploy your code,and try to add files, it will results in below error message:
 Document Store not available. Please configure the document store.


If you check your server logs, you will find some similar parts

<Error> <oracle.soa.services.common> <BEA-000000><oracle.bpel.services.workflow.repos.UCMUtil.getUCMInfo>
Error retrieving UCM information from the server.
Ensure that credential store map WF-ADMIN-USER with key WF-ADMIN-CREDENTIAL contains UCM server admin username/password.
Also ensure that Workflow configuration parameter UcmIdcUrl contains IDC socket connection url to connect to UCM server and UCM server has permission to let SOA server connect to it using IDC protocol.


You need to make sure that your SOA/WLS/UCM configuration is correct and these settings are scattered on multiple locations in Oracle Enterprise Manager.
Before we start you need to make sure you have the IDC (IntraDoc) port of your UCM installation. To verify this check your UCM configuration file: %domainhome%/ucm/cs/config/config.cfg
Most likely this will be 4444.

STEP 1 :
Right-click soa-infra -> SOA Administration -> Workflow config -> “More Workflow Notification Configuration Properties” -> workflow config -> human-workflow.
Make sure the setting UcmIdcUrl is configured correctly to contain the UCM-server hostname and IDC port.


STEP 2:
configure the username and password the BPM/SOA engine will use to connect to the UCM server which is located in the Weblogic section of EM. So rightclick on your domain in Weblogic Domain -> yourdomain -> Security -> Credentials.


STEP 3:
Create a new Map WF-ADMIN-USER and in that map create a new Key WF-ADMIN-CREDENTIAL
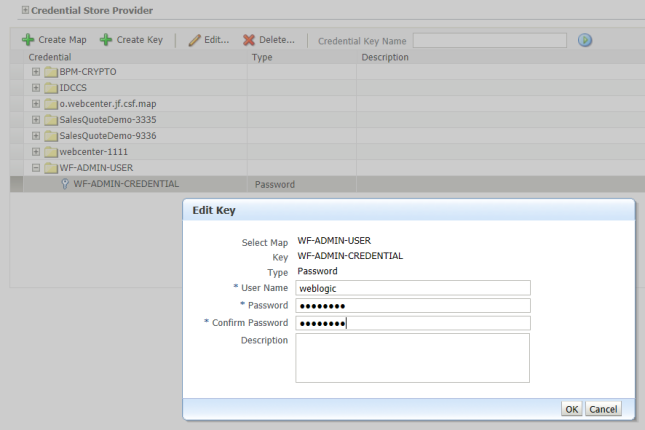


STEP 4 :
make sure the UCM server will accept our connection, so right click the Oracle Universal Content Management server in the WebCenter section of your Enterprise Manager. Make sure the Intradoc (IDC) serverport is correct and that the IP filter contains the SOA/BPM server hostname.


Save, restart if needed and check your Workspace Manager again for your attachments.

That’s’s all, Now you can attach files to your BPM or Human task flows.


You can see the attached file in your flow


If you have configured for the Notificatons in your Human task or BPM process, The attachments can be sent alongwith Notifications.


Will describe about the BPM Notifications in my next post.


Friday 3 March 2017

Creating a simple BPM Manual Process (To be initiated by User through human Task)


A Manual Process in Oracle BPM Suite 12c is a process that the user starts through a Human Task.
In this post we will create a BPM Process to add employees through a Human Task and generate a XML file through File Adapter.


Create a new BPM Application, name it as BpmHelloWorldApp and click Finish.
Right-click the project name and choose New > BPMN 2.0 Process.
In the BPMN 2.0 Process Wizard, choose Manual Process, name it as AddEmployee and click Finish.

Our BPM application was created.
Before we start to model our process, we need to create a new user.
Start the WebLogic Server, go to Console and create the hrofficer user.


Create the Canonical Model.
Go back to JDeveloper, create a new file inside Schema folder and name it as Employee.xsd.
Copy the following code inside the file.
 <?xml version= '1.0' encoding= 'UTF-8'?>
<xsd:schema xmlns:xsd="http://www.w3.org/2001/XMLSchema"
    targetNamespace="http://www.waslleysouza.com.br/ns/employee"
    elementFormDefault="qualified">
  <xsd:element name="EmployeeRequest">
    <xsd:complexType>
      <xsd:sequence>
        <xsd:element name="FirstName" type="xsd:string"/>
<xsd:element name="LastName" type="xsd:string"/>
<xsd:element name="HireDate" type="xsd:date"/>
<xsd:element name="Email" type="xsd:string"/>
      </xsd:sequence>
    </xsd:complexType>
  </xsd:element>
</xsd:schema>


In the Applications window, select the AddEmployee file.
In the Structure window, right-click the Process Data Objects and choose New.
Name the new Data Object as employee and choose browse in the Type field.
In the Browse Types window, click the Business Object button.
In the Create Business Object window, set the Name as Employee and Destination Module as Data.
Mark the “Based on External Schema” option and click the Schema Browser button.
In the Type Chooser window, expand the Employee.xsd file and choose EmployeeRequest.

Click OK.


Click the Yes button to create Data Module.


In the Browse Types window, choose Employee and click OK twice. 


Open the Organization file.
Edit the “Role” role and change it name to HrOfficer.
In the Members section, click the browse button.
In the Identity Lookup window, choose your Application Server and click the Lookup button.
Select the hrofficer user and click the Select button to associate it to HrOfficer role.
 

Click the OK button to confirm the changes.


Create a Human Task to add employees.
Go to AddEmployee file and double-click the User Task component.
In the Basic tab, name it as AddEmployee.
In the Implementation tab, click the Add button near Human Task field to create a new Human Task, and name it as AddEmployeeHT.
Click the Add button near Parameters section to open the Browse Data Objects window.
Expand Process and Data Objects nodes and drag and drop the employee node inside Parameters section.
Mark the Editable option and click OK.


Click Data Associations link and navigate to Output tab, connect the employeeRequest and employee nodes and click OK twice.

Open the AddEmployeeHT.task file.
Click the Form button and choose Auto-Generate Task Form.
Name the project as AddEmployeeUI and click OK.
 

Now we have a Human Task to add employees!
Let’s add a File Adapter to save the employee’s information as an XML File.
Open the BpmProject file and add a File Adapter inside External Reference section.
Name it as SaveEmployee and click Next 3 times.
 

Choose Write File as Operation File and click Next. 

Specify the Directory for Outgoing Files and File Naming Convention, and click Next.

Click the Browse for schema file button, choose the EmployeeRequest node and click Next. 

Click Finish.
In the AddEmployee file, add a Service Activity between AddEmployee and End Activities.
In the Basic tab, name it as SaveEmployee.
In the Implementation tab, choose Service Call as Type and SaveEmployee as Service.
Click Data Associations link, connect the employee and employyRequest nodes and click OK.

Click OK again.

Done!
To deploy your BPM Project, right-click the project name and choose Deploy > BpmProject.
Don’t forget to check all TaskFlow Projects.

Click Deploy.

NOTE: If you are facing issue, while deploying, refer to my previous post for other ways of deployment.
http://osb-dheeraj.blogspot.in/2017/02/human-task-implementation-in-oracle-soa_24.html


If your application was deployed successfully, go to Business Process Workspace (http://<HOST>:<PORT>/bpm/workspace).
Log in as hrofficer user and add a new employee.

Go to Directory for Outgoing File you specified and open the XML file created.