Showing posts with label sap adapter. Show all posts

Saturday 27 February 2016

OSB 12c - Domain Value map (DVM)


Hey guys !

Here I am going through the Domain Value map (DVM) functionality in OSB 12c.
In the 12c versions of OSB, Support for the DVM is included, Hence lets discuss the use case and Steps to implement DVM.

Use Case 

Simple Integration  Scenarios, Where Source system, Which sends data to Target System needs domain conversion of values.

A very typical example is Country name to Country Code conversion using DVM, i.e. Source system sends Country name and Target system expects Country code.

Design


Step 1 :

Open Jdevloper 12c (Service Bus console can also be used), Create a Service Bus Project.
I have given name to project as 'SBProject_DVM'

Step 2:

Create Source and target Schemas or WSDL (This is not a essential Step). For better demonstration, I Have used WSDL.


Step 3:

Create a Domain value map (CountryName_Code.dvm) and Add the Domain Name and Values. Atleast 2 rows needs be added.


Step 4:

Create a XSLT mapper (CountryNameToCode.xsl), Choose Source and Target to this mapper from your WSDL.


Step 5 :

User mapper to drag and Drop mapping element, Shown below


Step 6:

Go to XSLT source view and Edit the code as below 


Add this snippet 

<CountryCode>          
            <xsl:value-of select="DVMFunctions:lookupValue (&quot;SBProject_DVM/CountryName_Code&quot;, &quot;Name&quot;, string(/ns0:process/ns0:CountryName), &quot;Code&quot;, &quot;Unknown&quot; )"/>
 </CountryCode>


Now if you go to Design view, the below design will be visible


Step 7:

Create a new Pipeline Based on your WSDL and go to design view.
Add Pipeline pair to it, 
Inside Request Pipeline add a Stage. Inside stage add a 'Replace' action.
Inside Response Pipeline add a Reply action with Success.


Step 8:

Lets go to Replace action and use the Earlier created XSLT mapper to do the DVM  task.


In the input Field add the Variable which contains input element, as below


Step 9:

Save your changes and Export is to deploy to Test Server or Deploy directly from Jdeveloper.


Testing 

Step 1:

Open the Pipeline, click on test button, this will open in new window


Step 2:

Edit the request payload and click on Execute button to test it.
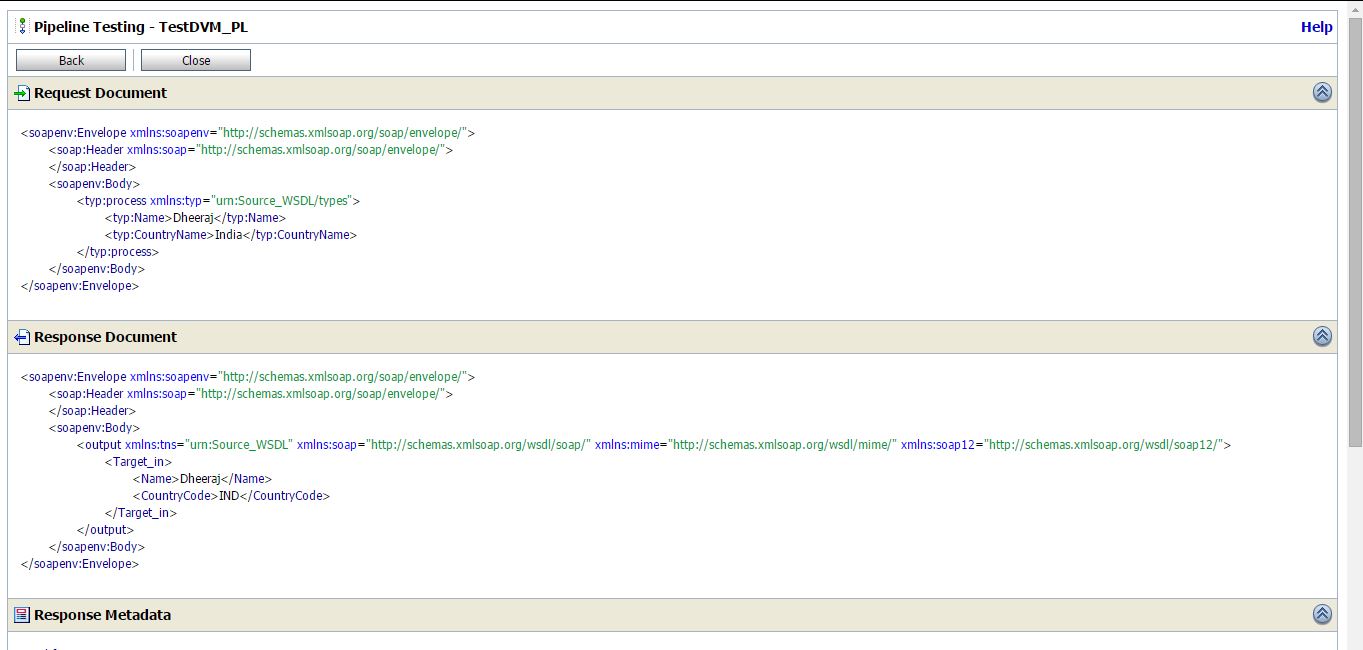


Voila !
You have successfully created DVM using OSB 12c


You can download the sbconfig jar of this project from
https://drive.google.com/file/d/0BxHj0h0tnxxOWWVYVXVvTGtWUGs/view?usp=sharing


Here are some other posts, which may interests you

1. Fusion Middleware 12c – SAP Adapter Configuration

http://osb-dheeraj.blogspot.in/2016/02/fusion-middleware-12c-sap-adapter.html

2. Oracle Integration Cloud Service (ICS)

http://osb-dheeraj.blogspot.in/2016/02/oracle-integration-cloud-service-ics.html


3. SOA Interview Questions : Service Oriented Architecture Interview Questions Part 1

http://osb-dheeraj.blogspot.in/2016/02/soa-interview-questions-service.html

Wednesday 17 February 2016

Fusion Middleware 12c Outbound - SAP Integration using SAP Adapter - Part 2

This post is in Continuation with my Previous post on this topic, You can find Part 1 at:

Fusion Middleware 12c Outbound - SAP Integration using SAP Adapter

http://osb-dheeraj.blogspot.in/2016/02/fusion-middleware-12c-outbound-sap.html


Now Let's Start with the further Steps:


Run Time Configurations


To start with Run time configuration, Log in to Weblogic Administration console of your domain.

a.       Navigate to:  Home >Summary of Deployments >SAPAdapter.
Then click on Configuration tab. Refer below screenshot


b.      Then Click on ‘Outbound Connection Pool’ Tab


c.       Click ‘Lock & Edit’ in Change Center . Then Click ‘New’ button to create a new Outbound connection.


d.      Clicking New button will start a create connection wizard. Select the existing Connection Factory, Then click Next


e.      Provide JNDI name same as you have given during Design Time, Then Click Finish button.


f.        Expand the Connection Factory by Clicking on ‘+’ button, You will see your new JNDI.


g.       Now click on the JNDI name, it will take you to Properties tab. Enter all of the Below properties and hit enter after each entry. These are same properties which was used during Design time.
UserName (DestinationDataProvider_JCO_USER),
Password  (DestinationDataProvider_JCO_PASSWD)
Client  (DestinationDataProvider_JCO_CLIENT)
Language  (DestinationDataProvider_JCO_LANG)
Application Server  (DestinationDataProvider_JCO_ASHOST)
System Number  (DestinationDataProvider_JCO_SYSNR)


h.      Click on the Save button, once all the properties are updated.


i.         As you can see in previous screen, now we need to Update the Deployment from using the Plan.xml, Navigate to : Home >Summary of Deployments. Check the box before SapAdapter.


j.        After Clicking on Update button, You will see a screen similar to below. Select ‘Update this application in place with new deployment plan changes’ and Check the Plan.xml location. If not correct, then update the location.


k.       Click on the Finish Button. After this, Activte the changes from Change Center


l.         Now you can deploy the Integration which was created using Jdevloper in Design Time.
m.    Once Integration is Deployed successfully, you can test it using Inbuilt testing console, in Service bus.


If  you want to download, configure and install required files for SAP Adapter, refer below:

Fusion Middleware 12c – SAP Adapter Configuration

http://osb-dheeraj.blogspot.in/2016/02/fusion-middleware-12c-sap-adapter.html


If you want to create Inbound to Fusion Middleware 12c from SAP then refer my previous Blog Post at :

Fusion Middleware 12c Inbound - SAP Integration using SAP Adapter

http://osb-dheeraj.blogspot.in/2016/02/fusion-middleware-12c-inbound-sap.html


Fusion Middleware 12c Inbound - SAP Integration using SAP Adapter - Part 2

This post is in Continuation with my previous post, You can find Part 1 at:

Fusion Middleware 12c Inbound - SAP Integration using SAP Adapter

http://osb-dheeraj.blogspot.in/2016/02/fusion-middleware-12c-inbound-sap.html


Lets continue with the Further steps


Run Time configurations

To start with Run time configuration, Log in to Weblogic Administration console of your domain.
a. Navigate to: Home >Summary of Deployments >SAPAdapter.
Then click on Configuration tab. Refer below screenshot


b. Then Click on ‘Outbound Connection Pool’ Tab


c. Click ‘Lock & Edit’ in Change Center . Then Click ‘New’ button to create a new Outbound connection.


d. Clicking New button will start a create connection wizard. Select the existing Connection Factory, Then click Next


e. Provide JNDI name same as you have given during Design Time, Then Click Finish button.


f. Expand the Connection Factory by Clicking on ‘+’ button, You will see your new JNDI.


g. Now click on the JNDI name, it will take you to Properties tab. Enter all of the Below properties
and hit enter after each entry. These are same properties which was used during Design time.
UserName (DestinationDataProvider_JCO_USER)
Password (DestinationDataProvider_JCO_PASSWD)
Client (DestinationDataProvider_JCO_CLIENT)
Language (DestinationDataProvider_JCO_LANG)
Application Server (DestinationDataProvider_JCO_ASHOST)
System Number (DestinationDataProvider_JCO_SYSNR)
Gateway Host (ServerDataProvider_JCO_GWHOST)
Gateway Service (ServerDataProvider_JCO_GWSERV)
Program ID (ServerDataProvider_JCO_PROGID)
Connection Count (ServerDataProvider_JCO_CONNECTION_COUNT)


h. Click on the Save button, once all the properties are updated.


i. As you can see in previous screen, now we need to Update the Deployment from using the Plan.xml, Navigate to : Home >Summary of Deployments. Check the box before SapAdapter.


j. After Clicking on Update button, You will see a screen similar to below. Select ‘Update this application in place with new deployment plan changes’ and Check the Plan.xml location. If not correct, then update the location.


k. Click on the Finish Button. After this, Activate the changes from Change Center.


l. Now you can deploy the Integration which was created using Jdevloper in Design Time.
m. Once Integration is Deployed successfully, you can test it using Inbuilt testing console, in Service bus.


If  you want to download, configure and install required files for SAP Adapter, refer below:

Fusion Middleware 12c – SAP Adapter Configuration

http://osb-dheeraj.blogspot.in/2016/02/fusion-middleware-12c-sap-adapter.html


If you want to create Outbound from Fusion Middleware 12c to SAP then refer my previous Blog Post at :

Fusion Middleware 12c Outbound - SAP Integration using SAP Adapter

http://osb-dheeraj.blogspot.in/2016/02/fusion-middleware-12c-outbound-sap.html

Fusion Middleware 12c Outbound - SAP Integration using SAP Adapter - Part 2

This post is in Continuation with my Previous post on this topic, You can find Part 1 at:

Fusion Middleware 12c Outbound - SAP Integration using SAP Adapter

http://osb-dheeraj.blogspot.in/2016/02/fusion-middleware-12c-outbound-sap.html


Now Let's Start with the further Steps:


Run Time Configurations


To start with Run time configuration, Log in to Weblogic Administration console of your domain.

a.       Navigate to:  Home >Summary of Deployments >SAPAdapter.
Then click on Configuration tab. Refer below screenshot


b.      Then Click on ‘Outbound Connection Pool’ Tab


c.       Click ‘Lock & Edit’ in Change Center . Then Click ‘New’ button to create a new Outbound connection.


d.      Clicking New button will start a create connection wizard. Select the existing Connection Factory, Then click Next


e.      Provide JNDI name same as you have given during Design Time, Then Click Finish button.


f.        Expand the Connection Factory by Clicking on ‘+’ button, You will see your new JNDI.


g.       Now click on the JNDI name, it will take you to Properties tab. Enter all of the Below properties and hit enter after each entry. These are same properties which was used during Design time.
UserName (DestinationDataProvider_JCO_USER),
Password  (DestinationDataProvider_JCO_PASSWD)
Client  (DestinationDataProvider_JCO_CLIENT)
Language  (DestinationDataProvider_JCO_LANG)
Application Server  (DestinationDataProvider_JCO_ASHOST)
System Number  (DestinationDataProvider_JCO_SYSNR)


h.      Click on the Save button, once all the properties are updated.


i.         As you can see in previous screen, now we need to Update the Deployment from using the Plan.xml, Navigate to : Home >Summary of Deployments. Check the box before SapAdapter.


j.        After Clicking on Update button, You will see a screen similar to below. Select ‘Update this application in place with new deployment plan changes’ and Check the Plan.xml location. If not correct, then update the location.


k.       Click on the Finish Button. After this, Activte the changes from Change Center


l.         Now you can deploy the Integration which was created using Jdevloper in Design Time.
m.    Once Integration is Deployed successfully, you can test it using Inbuilt testing console, in Service bus.


If  you want to download, configure and install required files for SAP Adapter, refer below:

Fusion Middleware 12c – SAP Adapter Configuration

http://osb-dheeraj.blogspot.in/2016/02/fusion-middleware-12c-sap-adapter.html


If you want to create Inbound to Fusion Middleware 12c from SAP then refer my previous Blog Post at :

Fusion Middleware 12c Inbound - SAP Integration using SAP Adapter

http://osb-dheeraj.blogspot.in/2016/02/fusion-middleware-12c-inbound-sap.html