Hi Guys,
Recently one of associate asked me about the MFL, so here I am writing this post on the usage of the MFL.
What I have experienced so far is, there are very few SOA experts who uses the Message Format Language or MFL.
There are others, who underestimates the MFL capability as compared to Oracle Technology adapters.
Lets get started..
Use case :
Reading a .csv file from file location, transforming to XML, and writing the XML file to another location.
Sample Input CSV Message -
CustomerID;Firstname;Lastname;Age
1212;Dheeraj;Mishra;25
3242;Ajay Kumar;Singh;43
Whereas Oracle technology adapters can only be used as a start point or end point of service.
Another advantage, MFL requires only one artifact (MFL transform file, .mfl file) for message transformation and no extra configuration is needed. Whereas Oracle Technology adapters will generate multiple artifacts like .wsdl file, .xsd file, .jca file etc.
Due to this Oracle Technology adapters can make the service complex when you have to cater for multiple formats conversion.
Implementation:
Step 1 - Create Proxy to read .csv file.


Step 2 - Create a Pipeline (Not applicable in 11g)


Thats it guys. You have completed the Service.
Now go on deploy it to server, and Test the Service
Here's the Sample output file
<?xml version="1.0" encoding="UTF-8"?>
<CSVToXML>
<Customer>
<customerId>CustomerID</customerId>
<firstName>Firstname</firstName>
<lastName>Lastname</lastName>
<age>Age</age>
</Customer>
<Customer>
<customerId>1212</customerId>
<firstName>Dheeraj</firstName>
<lastName>Mishra</lastName>
<age>25</age>
</Customer>
<Customer>
<customerId>3242</customerId>
<firstName>Ajay Kumar</firstName>
<lastName>Singh</lastName>
<age>43</age>
</Customer>
</CSVToXML>
Download the sample osb jar file from below link
https://drive.google.com/open?id=0BxHj0h0tnxxObDkzT2FCNUN6aEE
Recently one of associate asked me about the MFL, so here I am writing this post on the usage of the MFL.
What I have experienced so far is, there are very few SOA experts who uses the Message Format Language or MFL.
There are others, who underestimates the MFL capability as compared to Oracle Technology adapters.
Lets get started..
Use case :
Reading a .csv file from file location, transforming to XML, and writing the XML file to another location.
Sample Input CSV Message -
CustomerID;Firstname;Lastname;Age
1212;Dheeraj;Mishra;25
3242;Ajay Kumar;Singh;43
Background -
The MFL can be used to transform a Native format to XML and vice versa. The biggest advantage MFL provides is, It can be done in OSB message flow. So you have option to log or audit both the formats as well as you can use it anywhere in Message flow as per your need.Whereas Oracle technology adapters can only be used as a start point or end point of service.
Another advantage, MFL requires only one artifact (MFL transform file, .mfl file) for message transformation and no extra configuration is needed. Whereas Oracle Technology adapters will generate multiple artifacts like .wsdl file, .xsd file, .jca file etc.
Due to this Oracle Technology adapters can make the service complex when you have to cater for multiple formats conversion.
Implementation:
Step 1 - Create Proxy to read .csv file.


Step 3 - Add pipeline in Message flow

Step 4 - Now create a MFL transform file.

New MFL will look like below-

Step 5 - Add GROUP by right click on message icon in MFL. This is needed only if your Message or File has repeated records.
There are few properties on this page.
tick OPTIONAL if file can have only one record.
tick UNLIMITED if file can have more than one record.
Enter DELIMITER, usually \n for next line. Sometimes, it could be anything else like ; or " or | etc.
Tick DELIMITER IS OPTIONAL if this is possible to be used as delimiter for the last field in a record. As in our example, Last field uses \n as delimiter

Step 6 - Now add fields names as child elements in order of occurrence under Group.
Mention there Delimiters. Here delimiter is ;

Notice Last field has '\n' as delimiter

Step 7 - Test you MFL in Jdevloper itself

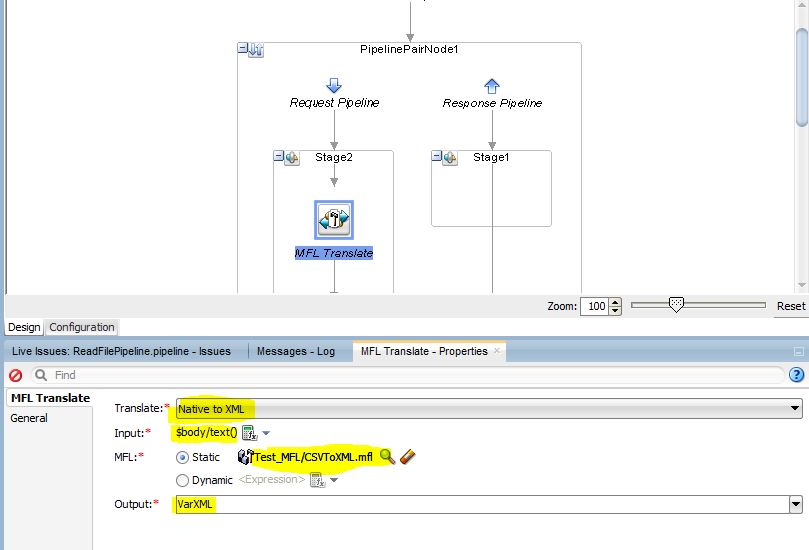
Step 8 - Now go back to Message flow, Add MFL transform Action. Specify the properties as shown.
Here MFL output is assigned to VarXML variable
Step 9 - Add replace action to put XML in Body content

Step 10 - Create Business Service to write XMl file.


Step 11 - Add Route, Browse Business Service


Now go on deploy it to server, and Test the Service
Here's the Sample output file
<?xml version="1.0" encoding="UTF-8"?>
<CSVToXML>
<Customer>
<customerId>CustomerID</customerId>
<firstName>Firstname</firstName>
<lastName>Lastname</lastName>
<age>Age</age>
</Customer>
<Customer>
<customerId>1212</customerId>
<firstName>Dheeraj</firstName>
<lastName>Mishra</lastName>
<age>25</age>
</Customer>
<Customer>
<customerId>3242</customerId>
<firstName>Ajay Kumar</firstName>
<lastName>Singh</lastName>
<age>43</age>
</Customer>
</CSVToXML>
Download the sample osb jar file from below link
https://drive.google.com/open?id=0BxHj0h0tnxxObDkzT2FCNUN6aEE


