This post is in continuation with my previous post, you can find the part 1 here
Step 5:
http://osb-dheeraj.blogspot.in/2016/02/invoke-web-service-hosted-at-oracle.html
Let's continue with steps
Step 5:
This will open a new Pop up, Select Basic, then click on OK.
Step 6:
Provide your Username and Password.
Step 7:
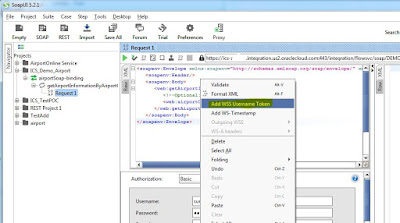
Now Right Click on the Request tab. You will see a window similar to below. Select 'Add WSS Username Token'
Step 8:
Select 'Password Text' and Click OK. This will add a Security Header in your Request.
Step 9:
Now again Right Click on Request Tab. Then Select "Add WS-Timestamp"
Step 10:
Select 60 in new pop up window Then click Ok.
This will Add Timestamp to your request
Step 11:
Now click on Test button, to execute the request. This button is highlighted in yellow
Step 12:
Thats all, you will receive the response from your ICS service
Congrats !, You have successfully invoked Web service hosted at Oracle ICS
For More Integrations and Design patterns, Please refer to My Other posts on ICS webservice integrations
1. Integration using Oracle ICS - Source ( Webservice ) to Target (Webservice)
http://osb-dheeraj.blogspot.in/2016/02/integration-using-oracle-ics-source.html


Best blog. Happy to read this.
ReplyDeleteOracle Integration Cloud Service Online Training